1. Use clipping tool. Select the DVD title or video in the center panel, and then click on the scissor icon on the right of the video thumbnail or the one under the preview window to prompt the clipping window. If you want to convert some segments of the DVD or video, please refer to Q2.
2. Specify start time and stop time manually. Highlight the DVD (Title), go to the right panel, find Output Duration option, enter start time and stop time value.
3. Convert DVD by chapters. Please go to "Basic Settings > Chapter" to specify the start and end chapter.
Select movie in the center panel, click Clipping Video tool ![]() , and click the Start Point and End Point to trim desired section.
, and click the Start Point and End Point to trim desired section.
To clip more than one segment, please click New Segment button, and repeat previous steps to trim another segment.
Step 1. Click Play button to start playing the video clip.
Step 2. Click the Start Point and End Point to trim desired section.
Step 3. Click New Segment button, and repeat step 2 to trim another segment.
Step 4. Click on the trimmed segment, and click Play Segment button to play selected segment.
Step 5. Click the Move Up and Move Down button to arrange the segment order.
Step 6. Click Apply to save the changes.
Step 7. Click OK to return to the main window.
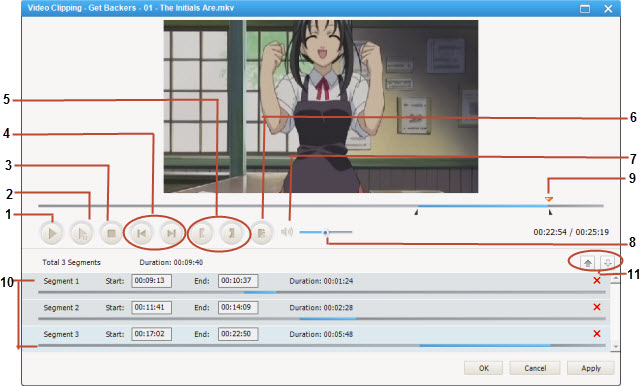
1 - Play/Pause: used to playback and pause video file.
2 - Play/Pause Segment: used to playback and pause selected segment.
3 - Stop: used to stop playing video file.
4 - Previous/Next Mark: allows you to conveniently move the playhead to previous or next mark point.
5 - Start /Stop Point: used to start and stop trimming video clip.
6 - New Segment: allows you to trim more segments.
7 - Mute: used to turn off the sound for a video currently playing.
8 - Volume Control: used to control the audio volume level.
9 - Scrubber Bar: This special scroll bar lets you move to anywhere in either a segment, or the whole movie.
10 - Segments Pane: clipped video segments are placed here.
11 - Move Up/Down: used to move clipped segment up and down.
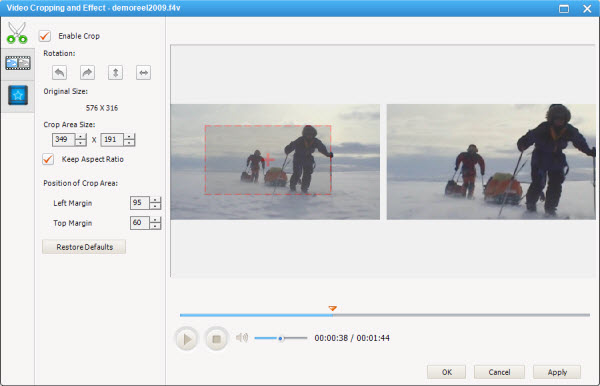
Select movie in the center panel, click Video Crop & Effects button ![]() , check Enable Crop box, set Crop Area Size and the Position of Crop Area to crop the video, or use the crop tool in the preview area to visually adjust the dimensions of the cropped area. Clip Apply to save changes.
, check Enable Crop box, set Crop Area Size and the Position of Crop Area to crop the video, or use the crop tool in the preview area to visually adjust the dimensions of the cropped area. Clip Apply to save changes.
Click Show Original Video and Show Video Cropped to toggle between original view and cropped view. Click Restore Defaults button to restore all the default settings of a video.
If you want to convert serveral video files and merge them into one single file, please first add files to the program then press the Ctrl or Shift button to choose the needed files on the center panel, then right-click on them and choose Merge All Files.
If you want to cancel the merging operation, please right-click on the files and choose the file and click Stop Converting.
Note: You need to click on "Convert Now!" button to implement the merging and converting action. Also, the unmerge action can only alppy before the converting.
Yes. But in current verison, the video is not really clipped before output, you need to output to implement the clipping actions, otherwise the merge output option will be gray and unavailable. Please first export your clipped video then re-add the output segments into program for merging.
After clipping and selecting output format, please click "convert now!" to process clipping. Then click on "Output Folder" on the lower left, you will find the output segments. Then click on "Add Video(s)" and browse to the exact output folder to add the output segments. Click "shift" to select all the segments and right click to merge.
Then you need to select the output format once again and click "convert now!" to output the merged video. Wait till completed to click output folder and you will find the output merged video.
The problem may be caused by different audio and video settings of the source files.
Supposed you have 15 videos clips needed to be merged, you can merge 5 video clips at a time, and then convert them with the same output settings. After that, please add the 3 output files as input files, merge them into one file with same settings, and then convert. It should work! And the merging will be fast if you use the same settings.
Note: Before merging video clips, please click ![]() button in the upper right corner of the main window. Choose "Video" Tab, and make sure all the options in the Video Resize area are unchecked.
button in the upper right corner of the main window. Choose "Video" Tab, and make sure all the options in the Video Resize area are unchecked.
FLV videos are using Adobe flash technologies, it's hard to position key frames in the FLV video. There is distance between the key frames which defines the starting and ending points of any smooth transition.
You can convert FLV to AVI or MP4 first, then trim the output AVI/MP4 file.
Please select movie in center panel, click Video Crop & Effects ![]() , click Video Effects
, click Video Effects ![]() button, in Other Effects section, click on "No effect" then you can activate the drop down menu and find rotation and flipping options.
button, in Other Effects section, click on "No effect" then you can activate the drop down menu and find rotation and flipping options.
Select movie in center panel, click Video Crop & Effects ![]() , click Video Effects
, click Video Effects ![]() button, and you can adjust brightness, contrast and saturation by either moving the slider or adjust a value for the effects.
button, and you can adjust brightness, contrast and saturation by either moving the slider or adjust a value for the effects.

